Configure Global Registration Fields
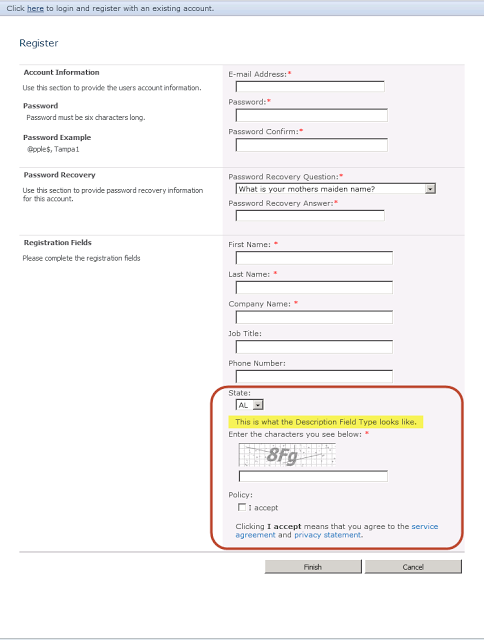
Registration is one of the core concepts in ExCM. There are two types of registration: Anonymous and by Invitation. The most common, by far, are the Invitation Registrations. You send an e-mail to a potential new user, they click on the Registration link provided and they are taken to the custom Registration Page on your site. Here is an example of the Registration Form:

This page can be completely customized to capture the data you want from your users. In the example above, we are capturing the following (field type in parentheses):
· First Name (Text)
· Last Name (Text)
· Company Name (Text)
· Job Title (Text)
· Phone Number (Text)
· Zip Code (Text)
· Captcha (Captcha)
· Site Policy (Policy)
In addition to the field types above, you can also implement the following field types:
· Description – Provides a way to enter lines of text for descriptive or informational purposes
· Choice – Presents selections as either a drop down, radio button, or checkbox
There are two ways you can edit the fields that appear on the Registration Page: 1) by Site Collection via the User Interface (UI) and 2) globally via the web.config file.
In most cases, you will want to capture certain fields on every site (First Name, Last Name, Company Name, etc.), so it makes sense to configure those globally and add the more specialized fields (Captcha and Policy) via the UI.
However, what if you are running ExCM on hundreds of sites? It would be very time consuming to go into each site and configure the additional fields. In that case, you would want to choose the common fields for ALL your sites and configure them globally. In this article, we will look at how to configure all the field types globally via the web.config file.
Important Note: Depending on the field type, some global registration field edits to the web.config file can be made via Central Administration and the Extranet Global Configuration Timer Job, while others can only be made by making manual edits to all of your web.config files. We break these out into seperate groups of instructions in the remainder of this article.
AddChange Global Registration Fields - Field Type = Text, Choice, Description or Captcha
To add or change Global Registration fields that are of the type "Text", "Choice", "Description" or "Captcha", follow these procedures:
- In Central Administration, navigate to General Application Settings > Extranet Collaboration Manager > Global Registration Settings:

- On the Global Registration Settings page, select your extranet web application from the drop down:

- In the Registration Fields section you will see the out-of-the-box global registration fields listed. You can click on the name of any of these fields to change their settings or delete them. If you want to add a new global registration field, click on the Add Registration Field link:

- Give the new field a name (no spaces or special charachters are allowed), a Display Name (spaces allowed), and choose the field type and settings as appropriate, then click Save:

- You will see a message indicating that the Extranet Global Configuration Timer job will need to run for your new field to be added to your web application's configuration settings. Click Close at the bottom to return to the list of fields:

- Your new field will not immediately show up on the page, but after the Global Extranet Configuration Timer Job runs (5 - 10 minute wait), you can click Refresh on the page and the new field should appear:

Note: The Extranet Global Configuration Timer Job will automatically push out the necessary web.config file edits to every SharePoint server in your farm.
AddChange Global Registration Fields - Field Type = Policy
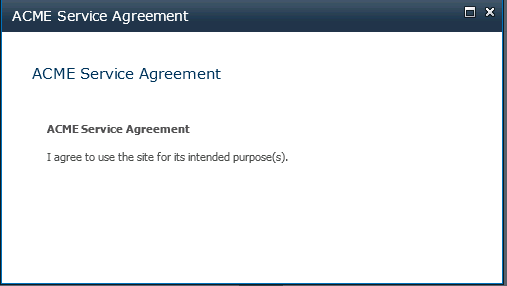
The "Policy" field type can be used to require the user to accept a policy (e.g. Terms of Service, Privacy Policy, etc.) during the registration process. In the first screen shot in this article you can see a "Service Agreement" policy acceptance requirement.
First, I need to give you a little background on how Global Registration Fields are actually defined "under the hood". Let’s take a look at the area in the web.config file for the extranet web application where the Global Registration fields are declared. Here is the out-of-the-box default configuration:
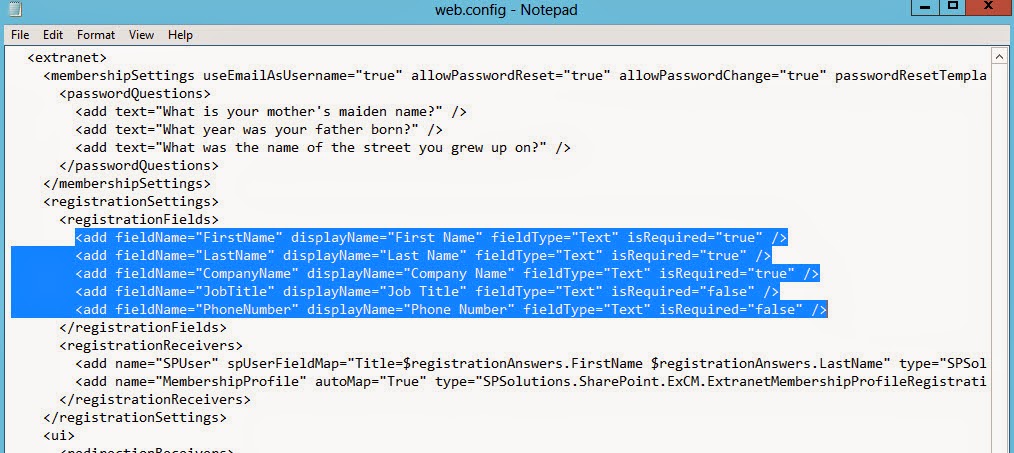
As described in the previous section, if you want to addchange fields in the list and the field type is Text, Choice, Description, or Captcha, there is no need for you to manually edit this file - you can just use the Central administration feature (as described above) to make those changes.
The "Policy" field type is a little more complex, however, and requires that you make manual web.config edits, because it typically contains HTML content, which is invalid in an XML attribute.
As a result you, we will need to add the policy message content to a resource file (.RESX) and place it in the App_GlobalResources directory of the IIS site (normally located at C:inetpubwwwrootwssVirtualDirectories{your extranet web application folder}App_GlobalResources).
To set up a global site policy field for your registration forms, you need to start by creating a suitable .RESX file for your specific site policy.
We provide a zipped starter collection of files for use with Global Policy Fields that can be downloaded from here:
In it, you will find the following files:
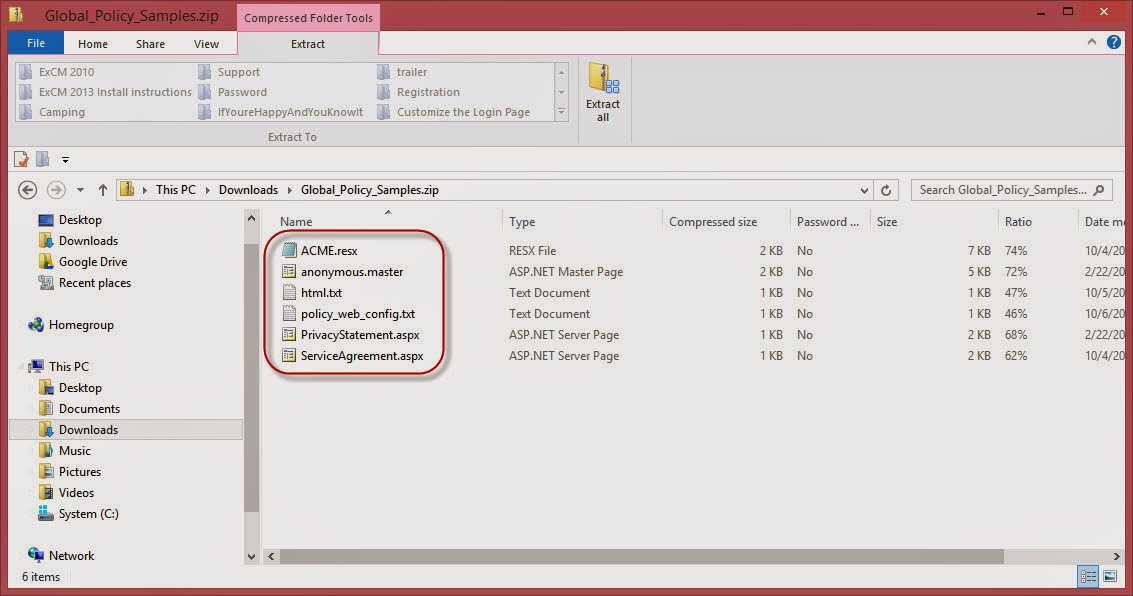
Note that I have also used “ACME” in the sample config files to remain consistent with this article. In your case, you will want to replace all instances of “ACME” with your company name.
The first file in the list is the resource file itself. This is where you will enter the HTML changes you want to make for the Policy Field.
The next is a sample anonymous master page that I will use for this article. In my environment, I have Anonymous Access turned off on both my Web App and IIS for this site, so I will need to reference this anonymous master page to allow the users to see the Policy Field.
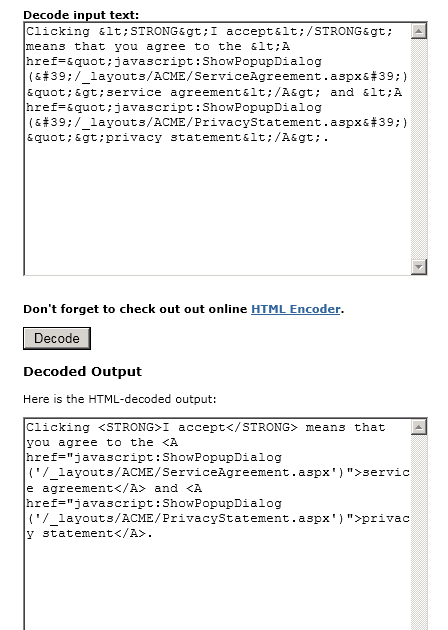
The third is a text file that simply contains the HTML portion of the resource file to make editing easier. Decoded, it looks like this:
The third is a text file that simply contains the HTML portion of the resource file to make editing easier. Decoded, it looks like this:
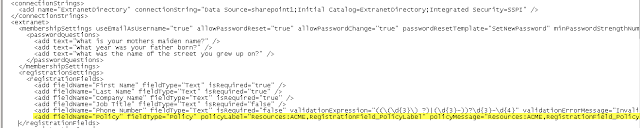
The “policy_web_config” file is the Policy Field tag that will need to be added to the content site web.config file for the Registration Field as mentioned earlier:
<add fieldName="Policy" fieldType="Policy" policyLabel="Resources:ACME,RegistrationField_PolicyLabel" policyMessage="Resources:ACME,RegistrationField_PolicyMessage" />
Finally, “PrivacyStatement.aspx” and “ServiceAgreement.aspx” are sample files you can edit to suit your needs. For the purpose of this article, I will only configure the Service Agreement. The configuration of the global Privacy Statement would follow the exact same steps.
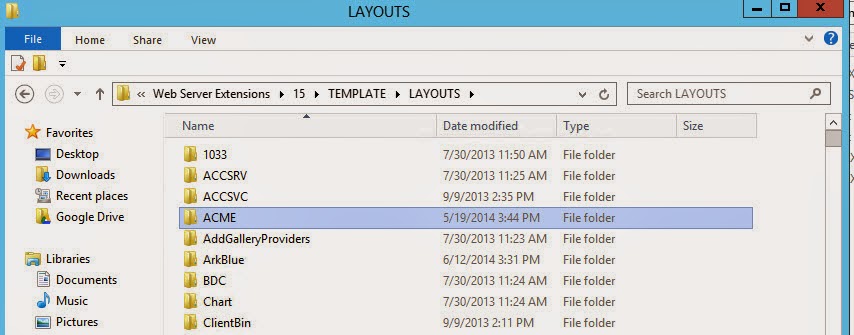
The first thing you need to do is create a folder in the 15 hive to store your custom Policy. By default you would create it here:
C:Program FilesCommon FilesMicrosoft SharedWeb Server Extensions15TEMPLATELAYOUTS
Important: In a multi-server farm, you will need to duplicate this procedure on EVERY SERVER IN THE FARM.
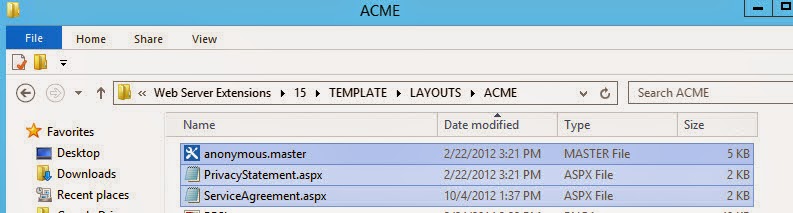
In this case, I will create a folder named “ACME”:
Once it’s created, you need to copy the following files from the zip file into your new directory:
Important: In a multi-server farm, you can do the next few steps on one of the servers and then copy the edited files to the other servers:
Now you need to edit the “ServiceAgreement.aspx” file to reflect your desired customizations. I have highlighted the areas I changed below:
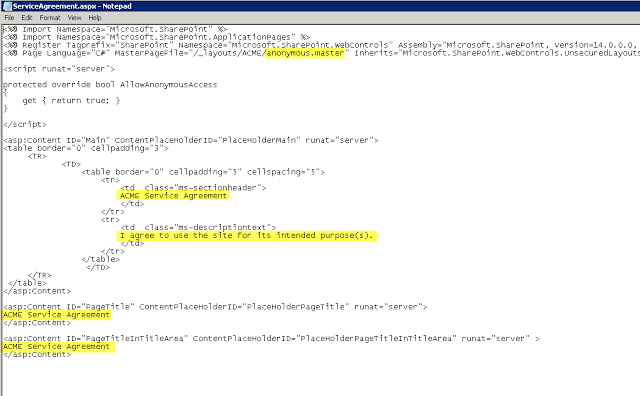
The first change I made was to reference the “anonymous.master” master page due to my specific environment configuration. Next, I gave the header the name “ACME Service Agreement,” and did the same for the PageTitle and PageTitleInTitleArea tags. Finally, I put a very brief custom agreement in the “descriptiontext” tag.
Next, let’s make the necessary edits to the included resource file. The area we are looking for is at the bottom of the file:
Next, let’s make the necessary edits to the included resource file. The area we are looking for is at the bottom of the file:

The full text as it appears there is as follows:
data name="RegistrationField_PolicyLabel" xml:space="preserve">
<value>I accept</value>
</data>
<data name="RegistrationField_PolicyMessage" xml:space="preserve">
<value>Clicking <STRONG>I accept</STRONG> means that you agree to the <A href="javascript:ShowPopupDialog('/_layouts/ACME/ServiceAgreement.aspx')">service agreement</A> and <A href="javascript:ShowPopupDialog('/_layouts/ACME/PrivacyStatement.aspx')">privacy statement</A>. </value>
</data>
Notice I have simply changed the path from “/SPSolutions/ExCM” to reflect our newly created folder “/ACME.” Once the changes have been saved, you just need to copy the resource file to the “App_GlobalResources” directory under your content site:

Important: In a multi-server farm, you will need to copy the files, once you have edited them on the first server, to all other servers in the farm.
The final step is to add the Policy Registration Field tag to your web.config file (located at C:inetpubwwwrootwssVirtualDirectories{folder for your extranet web application}), as shown below. This will make it globally available to all Site Collections in your Web Application:
Important: In a multi-server farm, you will need to make the above web.config file edit on each server in your farm. Ideally, the edit should be made manually on each server, rather than copying the web.config from one server to another.
Now we’re ready to take a look at the update Registration Page with our Global Fields:
And here is how our customized Service Agreement now appears:
As mentioned earlier, you can follow the same steps to also customize the Privacy Agreement.
©2019 PremierPoint Solutions. All Rights Reserved.